Windows 10 Sleeps Before Set Time
 Sebastian Wright
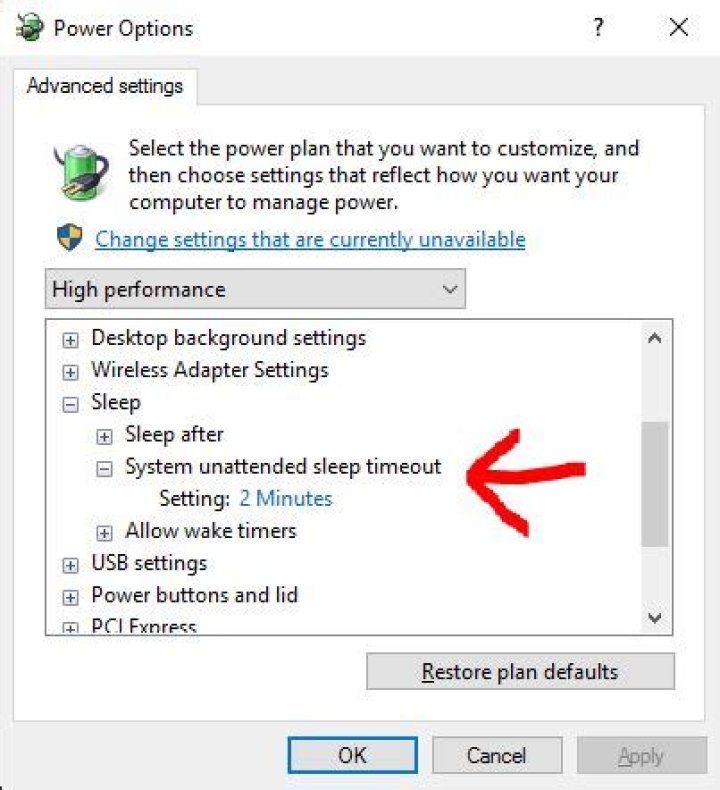
My computer is falling asleep outside of the screen and sleep times that I have set. I have made sure that the screen saver is set to none, and that the power options and advanced settings match the sleep settings. Regardless, though I have set sleep to 1 hr, it will go to sleep after approximately 2-4 minutes. If I reboot, this will solve the problem temporarily until the computer sleeps normally or I initiate sleep. After that it reverts to the abbreviated sleep mode. This started happening after I installed Windows 10. Additionally, I'm using a wireless mouse and keyboard (Microsoft & Logitech) that I have turned off the "allow this device to wake your PC" option, but the same thing happens.
This computer was made by a third party, but I checked through the command line, and the motherboard is an Intel Desktop DP55WB Media Series microATX.
Any clues as to where I should start looking?
73 Answers
System unattended sleep timeout
There is a hidden setting in the Power Options control panel called System unattended sleep timeout. By default it is set to two minutes and is not visible in the control panel. As far as I know, a registry tweak is required to make it visible.
The tweak involves changing the value of the "Attributes" key from 1 to 2 in the following location:
[HKEY_LOCAL_MACHINE\SYSTEM\CurrentControlSet\Control\Power\PowerSettings\238C9FA8-0AAD-41ED-83F4-97BE242C8F20\7bc4a2f9-d8fc-4469-b07b-33eb785aaca0]
Changing the value back to 1 re-hides the power option.
After making the above registry tweak open the Power Options control panel and there should now be a System unattended sleep timeout setting:
A reboot may be a good idea after.
You can read more about it here (and also download a .reg patch file if you want):
Console lock display off timeout
There is also a somewhat related setting Console lock display off timeout which also requires a registry tweak to enable. I did not find this tweak necessary to fix my problem but perhaps you may. The tweak again involves changing the value of the "Attributes" key from 1 to 2, this time in the following location:
HKEY_LOCAL_MACHINE\SYSTEM\CurrentControlSet\Control\Power\PowerSettings\7516b95f-f776-4464-8c53-06167f40cc99\8EC4B3A5-6868-48c2-BE75-4F3044BE88A7
And you can read more about it here:
9For further solution thoroughness in case all other solutions provided do not work to keep the Windows machine from going into a power saving or sleep mode, I'll provide a workaround solution that has worked for me when no other settings could be determined to resolve it otherwise.
Prevent Windows from Sleeping
Note: You can still set any other power saving prevention settings I don't mention if you want.
Creating Script Directory
Create a
C:\ScriptsandC:\Scripts\Tempfolder change theScriptDirvariable value to be something different if you wish and use the below command line logic to do this for youCopy and paste this into command line to create the folder this way
SET ScriptDir=C:\Scripts
IF NOT EXIST "%ScriptDir%" MD "%ScriptDir%"
The batch script below needs to be copied into the root of the
C:\Scriptsfolder
Creating Batch Script
This is the batch script you'll create and/or copy to the script directory you decided to use so you can automate the script execution with Task Scheduler.
Essentially this script uses sendkeys to emulate the pressing of the spacebar 8 times but I put the logic in a FOR /L to lessen the script logic needed.
@ECHO ON
IF NOT EXIST "%~dp0Temp" MD "%~dp0Temp"
SET TempVBSFile=%~dp0Temp\~tmpSendKeysTemp.vbs
IF EXIST "%TempVBSFile%" DEL /F /Q "%TempVBSFile%"
FOR /L %%A IN (1,1,9) DO ( IF %%A==1 ECHO Set WshShell = WScript.CreateObject^("WScript.Shell"^)>>"%TempVBSFile%" IF NOT %%A==9 ECHO Wscript.Sleep 500 >>"%TempVBSFile%" & ECHO WshShell.SendKeys " ">>"%TempVBSFile%"
)
EXIT
Schedule a task with Task Scheduler using the settings as specified in the Scheduling Batch Script section
Scheduling Batch Script
Note: Open Task Scheduler or type in Taskschd.msc from Run and press Enter.
From the General tab you will want to be sure the Run whether user is logged on or not is checked, Run with the highest privileges is checked, and that you also run the task with a credential that has local administrator privileges is you can.
From the Triggers tab, define a New trigger and be sure to set options:
- Begin the task: with a value of
On a schedule - Start: with a time value of
12:00:00 AM - Settings: with the
Dailyvalue checked - Recur every: with a
1day value - Repeat task every: with a
10 minutesvalue - For a duration of: with an
Indefinitelyvalue The
Enabledoption should be checked
- Begin the task: with a value of
From the Actions tab, define a New action and be sure to set options:
- Action: with a value of
Start a program - Program/script: with a value of full path to the batch script i.e.
C:\Scripts\WakeUpWindows.cmd Start in (optional): with the value of the script directory i.e.
C:\Scripts
- Action: with a value of
From the Conditions tab be sure to set and/or check to enable options:
Start the task only if the computer is idle for: should be checked and have a value of
10 minutes- Only execute the script if the computer has been idle for 10 minutes. If the computer has not been idle for 10 minutes then likely someone has used it and the process shouldn't need to run yet.
Wait for idle for: with a value of
5 minutes- When the idle for 10 minutes condition is false this tells it keep checking for up to an additional 5 minutes and still execute the script if the 10 minute idle condition becomes true within that 5 minute window.
The
Stop if the computer ceases to be idleoption should be checkedIf the Stop if the computer ceases to be idle condition is selected for a task and the task is running while the computer is in an idle state, then the task will stop running when the computer ceases to be idle.
The
Wake the computer to run this taskoption should be checked
A computer is considered to be in an idle state when a screen saver is running. If a screen saver is not running, then the computer is considered to be in an idle state if there is 0% CPU usage and 0% disk input or output for 90% of the past fifteen minutes and if there is no keyboard or mouse input during this period of time. Once the Task Scheduler service detects that the computer is in an idle state, the service only waits for user input to mark the end of the idle state.
Additional Power Saving Settings
From an elevated command prompt run
POWERCFG -H OFFto disable hibernation just in case it’s not already disabled.Copy
control /name Microsoft.PowerOptionsinto Run and then press Enter.Click on Change plan settings for whichever Preferred plan is checked to open the Edit Plan Settings screen.
Be sure the Put computer to sleep value is set to Never, and then click on the Change advanced power settings option
From the Advanced settings find and expand Hard disk, and then set the Turn off hard disk after Setting (minutes) to a value of Never
Note: Be sure to Apply and Save Changes where applicable
Open Device Manager or type in
devmgmt.mscfrom Run and press Enter.From Device Manager expand Network adapters, right click on the main NIC (or all if you wish one-by-one) and select Properties. From the Power Management tab, uncheck the option Allow the computer to turn off the device to save power.
Further Resources
2Just for completeness, sometimes the root of this problem are customized power plan settings.
To fix it by resetting and then re-configuring your power settings, you need to:
- Start Menu -> Settings -> System -> Power & sleep in the left pane.
- In the right pane, click on Additional power settings.
- Select Choose when to turn off the display.
- Click on Change advanced power settings.
- Click on Restore plan defaults.
The Power Troubleshooter can also help, accessed via :
Start Menu -> Troubleshooting -> Improve power usage -> Power.