How do I use an .img.xz file or get an .img file from it?
 Mia Lopez
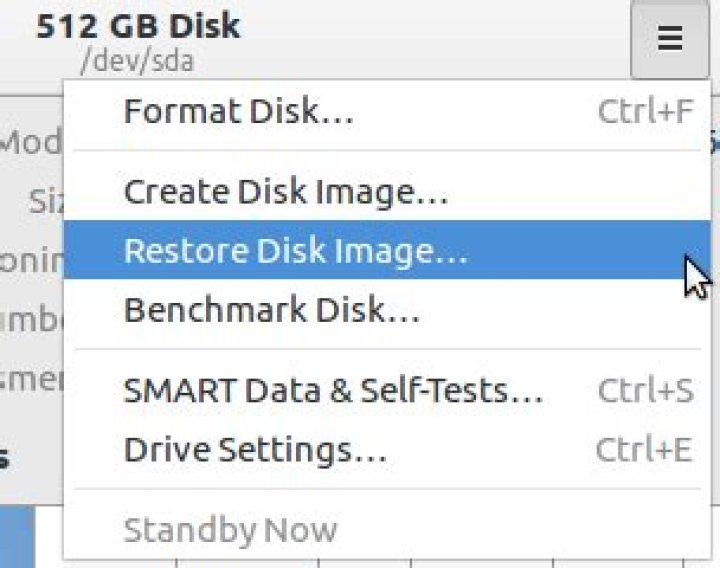
I have a file with an xz extension, ubuntu-19.10-preinstalled-server-arm64+raspi3.img.xz. How do you get the .img out of it?
My goal is to flash the file on an SD card. I want to use I finally got it to work, but etcher will only handle .iso and .img files.
6 Answers
xz is a compression format like zip or gz. To be able to decompress it from the command line you need to install xz-utils:
$ sudo apt-get install xz-utilsand then use this command to decompress your file:
$ unxz ubuntu-19.10-preinstalled-server-arm64+raspi3.img.xzIf you are under windows you can use 7zip
4Decompressing .xz files in general
ubuntu-19.10-preinstalled-server-arm64+raspi3.img.xz is the result of compressing a single file, ubuntu-19.10-preinstalled-server-arm64+raspi3.img, with xz. You can uncompress it with:
unxz ubuntu-19.10-preinstalled-server-arm64+raspi3.img.xzThat will extract ubuntu-19.10-preinstalled-server-arm64+raspi3.img and, assuming it succeeds, delete ubuntu-19.10-preinstalled-server-arm64+raspi3.img.xz. If you want to keep that original .xz file, you can pass the -k/--keep option:
unxz -k ubuntu-19.10-preinstalled-server-arm64+raspi3.img.xzNote that this is different from what you would usually do for a .tar.xz file, since tar supports decompressing and extraction through a single command. In the case of a .xz file (unless the file is very misleadingly named), only decompression is needed.
Flashing the preinstalled Ubuntu Server image in particular
The particular file you've downloaded is a preinstalled image for Ubuntu Server 19.10. Assuming the file was correctly and successfully downloaded (see below), you can use the official instructions to flash this image to a storage device. The best way to do this differs depending on what operating system you're using to do it. But assuming it's Ubuntu, here's a summary:
Find the name of the device that you are writing it to. One way to do this is in Disks (your file browser). Make sure this is not the name of a device that contains any data you wish to keep!
Run this command, replacing
devicewith the device name you found:xzcat ubuntu-19.10-preinstalled-server-arm64+raspi3.img.xz | sudo dd of=device bs=32MThere,
xzcatis doing the work ofunxz. If you have a corrupted file,xzcatwill fail, just asunxzwould.If you ran
unxzand got a.imgfile, then don't use that command above withxzcat. In that case, use this command instead:sudo dd if=ubuntu-19.10-preinstalled-server-arm64+raspi3.img.xz of=device bs=32M
It is not typically possible to write a flash drive with dd in a WSL system. So if you're running Ubuntu in Windows 10 with WSL, those instructions don't apply. But in that case you can just use a Windows method (see the official instructions).
Dealing with possibly incomplete or corrupted files
If decompression fails with an error message about how the file format is not recognized, then especially if running file on it is unable to identify the format as XZ compressed data (though sometimes otherwise), you likely have a corrupted or incomplete download. You can use ls -l to find the length of your file in bytes and compare that length to the expected length--for that particular file, the length should be 661217868. That addresses most cases of incomplete downloads and a few cases of corrupted downloads, but it is far from perfect.
Many files available for downloading, including ubuntu-19.10-preinstalled-server-arm64+raspi3.img.xz all the Ubuntu images, have checksums that can be used to more reliably gauge if the file was completely and correctly downloaded. For security purposes, it's a good idea to check the GPG signautre on the file providing the checksums (and to avoid MD5 checksums, which are weak against deliberate attacks). But for checking for inadvertent corruption, it's enough to look up the checksum and test your file.
The kind of checksum provided and recommended for checking Ubuntu images these days is a SHA256SUM. This file contains the SHA256SUMs for the 19.10 server images, including ubuntu-19.10-preinstalled-server-arm64+raspi3.img.xz. One of its lines is:
52ca28f21685eef965d476a716a7bc01237456d6a8770a56630299036eade0bf *ubuntu-19.10-preinstalled-server-arm64+raspi3.img.xzRunning the sha256sum utility on your file should produce a checksum that matches exactly, like this:
$ sha256sum ubuntu-19.10-preinstalled-server-arm64+raspi3.img.xz
52ca28f21685eef965d476a716a7bc01237456d6a8770a56630299036eade0bf ubuntu-19.10-preinstalled-server-arm64+raspi3.img.xz
If it does not, then your download was corrupted or incomplete and that's probably the explanation for your difficulty decompressing or otherwise using the file.
4As far I can see on my Ubuntu 16.04 LTS system - the GNOME Disks utility allow to restore disk image in GUI way:
- Select target drive.
Click on hamburger button, and then select Restore Disk Image
Then it will ask the path of image file:
here you can select any of *.img, *.img.xz (sic!) and *.iso formats.
Double check that destination is correct and then hit Start Restoring... button on opened window.
You can use mkusb-dus to extract and clone directly from an img.xz file (compressed file with xz).
Install mkusb
If you run standard Ubuntu live, you need an extra instruction to get the repository Universe. (Kubuntu, Lubuntu ... Xubuntu have the repository Universe activated automatically).
sudo add-apt-repository universe # only for standard Ubuntu
sudo add-apt-repository ppa:mkusb/ppa # and press Enter
sudo apt-get update
sudo apt-get install mkusb mkusb-nox usb-pack-efi
Run
dusin the directory where you have the file, in generaldus file.img.xzin your case
dus ubuntu-19.10-preinstalled-server-arm64+raspi3.img.xz
It is important that the target drive (the memory card of a Raspberry Pi) is big enough for the image. It must be exactly the same size or bigger.
- If there is an MSDOS partition table it will be straightforward to clone an image to a drive that is bigger than the image.
- If there is a GUID partition table, GPT, and the drive is bigger than the image, a backup partition table must be written to the end of the drive. mkusb will do it automatically. With some other cloning tools you may have to fix it yourself afterwards, for example with
gdisk.
Open the file with the Archive Manager and extract the img file from there.
You can use balenaEtcher (Windows, macOS, & Linux) to directly flash the .img.xz image to the SD card. In one step, Etcher will decompress the .img.xz image and flash the resulting .img file to the SD card.
Etcher supports following formats: zip, etch, gz, bz2, xz, img, iso, dsk, hddimg, and raw.