Can you clone a larger drive onto a smaller drive (used space fits on the smaller)
 Emily Wong
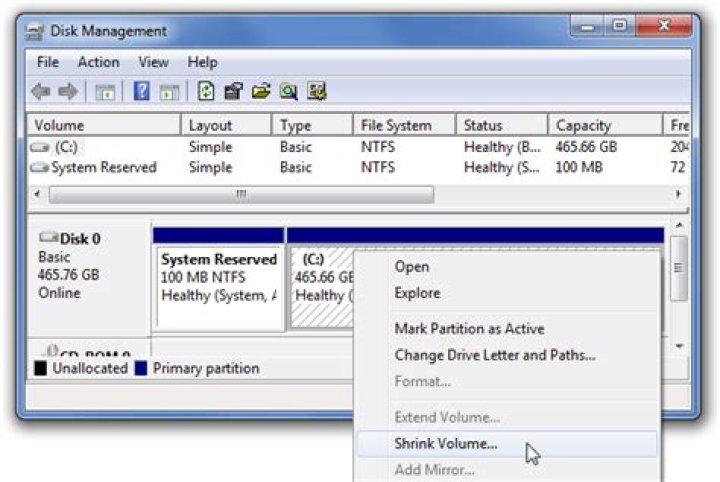
I have a 500GB drive which is about 50GB full. I got a 80GB SSD, which has 74.5GB of available space. I want to clone the system drive onto the SSD.
DriveImage XML will not let me copy a larger drive to a smaller one.
9 Answers
You could use something like Gparted to resize the partition on the 500GB drive to a size that will fit on the SDD and then copy the partition from one drive to the other.
2Symantec Ghost 2003 will clone larger drives to smaller drives if the data will fit.
However, if the drive is a Vista boot drive using NTFS, you will have to use your Windows Install or Repair disc to "repair" the drive in order for it to boot. This isn't because the clone operation failed. It's because if you change the size of the NTFS boot volume without updating some parameter in Vista, it believes the HD is corrupt. This is a simple procedure that marks the correct size and then your drive works as expected.
I have done this successfully several times -- the most recent was when I went from a 300GB Velociraptor drive to a 160 GB Intel SSD for my Vista boot drive.
UPDATE: For Windows 7, you can use a newer version of Ghost like 11.5 -- Also, you may need to use "-NTEXACT" if you want the drive to boot.
1Use GParted and Clonezilla.
If you have Norton Ghost available that is the way to go, because it will do everything automatically. However, if you do not want to spend the money go with the GParted/ Clonezilla option, the way it works is like this:
- Use GParted to resize the source drive
- Boot the resized source drive so that the operating system in it can check for any possible filesystem errors.
- Use clonezilla to clone the drive
Read this article - it has everything step-by-step:
Symantec Ghost (Ghost32.exe v11/2003) will do it, as long as the used space doesn't exceed the space available on the target volume.
Go to Local > Disk > To Disk, select source and destination drive and let it work its magic.
While the majority of solutions I found on the Internet recommend to use Gparted and Clonezilla in a multi-step process, I found a Windows based one-stop solution called EaseUS Todo Backup Free () that did the job for me very well. It can clone a disk with multiple partitions, resize the partitions on the fly and even has some "Optimize for SSD" function (whatever that does).
I copied a 1 TB HD with 4 partitions to a 512 GB SSD and could boot from the SSD instantaneously. The only thing that happened after the transfer was the fact that Windows recognized the new hardware after the first boot and asked to reboot once. After that the system worked like a charm.
Be warned though: While the "Clone Disk" function of EaseUS TBF worked perfectly, I was not so lucky with the "Clone Partition" function. Trying to clone the first partition of a disk only resulted in a non-bootable SSD, probably due to a corrupt MBR or partition table. But as long as you want to clone whole disks, this software seems to be great.
2- Roadkils Raw Copy - large to small disc = HDD....
- EG: System OS or info HDD is the large disc and the small disc are attached as slaves = meaning as static non-OS HDDs plugged into non primary HDD ports on a mobo that has a 3rd HDD with OS to use with Rawcopy installed & ready to use....
- The GUI = Graphical User Interface is Source to Destination - Set this and proceed, when you see the progress readout with no errors it is still copying all info and the empty space,- Next is important!....
Next you will shortly or eventually see ERRORS and this is OK and will continually log many errors, So, Cancel the copy procedure when you see the error count rising, your disc is ready or almost ready.... A Win7 clone requires the install disk to repair the Win7 clone HDD and works nicely 9 out of 10 times....
I prefer XP for cloning or doing Raw Copying - which is bit for bit copies.... When copying an XP HDD I have found it useful to activate the disc in the management console under disk-management, then close the management console, then one more unusual step after activation of the cloned partition - IS TO shut the power off to the computer not a proper shutdown......... Tho a proper shutdown usually is fine - it seem like the shutdown process marks it as a non primary disc or something similar, this may be due to the service pack edition of the OS ?......
Rawcopy is great for data recovery on corrupted discs due to it's ability to just keep copying anyway.
You could shrink the partition before cloning it.
Modern versions of Windows will allow you to shrink NTFS partitions directly using Disk Management (diskmgmt.msc). See e.g. .
You just have to right-click the drive, select "Shrink Volume...", and enter how many megabytes you want to remove from the size. It even allows you to shrink an active C:\ partition.
In situations like these, given NTFS isn't an officially open standard, I would tend to put more trust in Windows utilities than in third-party reimplementations like in GParted.
I would use PartedMagic as it puts all this stuff together in an extremely easy-to-use BootCD/USB, including CloneZilla and GParted. The advantage is that you don't have to restart so much to use different packages, it really does make the whole deal a lot faster. In terms of process I would resize the partition using GParted, then just clone the thing using CloneZilla with the option to ignore drive size enabled. The other thing I found nice about PartedMagic is the drives always show up with their descriptors (eg. Toshiba EAV-2323 or what have you) by default, which makes identifying drives and not screwing up the source drive much less likely.
2I. Using DriveImage XML 2.50 to Back Up the Data on an Internal Hard-Disk Drive Onto an External Hard-Disk Drive and Fixing a Disk- and/or Partition-Size Problem in This Procedure
Yes, gratefully using the free computer program DriveImage XML 2.50, the installation file for which was obtained from the Internet, I was finally able to clone the data on a Windows-10-containing partition of an internal Hard-Disk Drive (HDD) with a capacity of about 500 GigaBytes (GB) onto an external HDD with half that capacity, or about 250 GB, of the internal HDD. To do that in DriveImage XML 2.50 I think I used “Backup,” “Raw mode,” “Good (slow!)” compression of the data, and “Try Volume Locking first.” [On October 18, 2016 I instead had the check box beside “Raw mode” unchecked, selected “Fast” compression, and before starting a new hard-drive backup had deleted the Drive_C.dat and Drive_C.xml files on my external hard drive that I had made in a previous internal-hard-drive backup of the data on logical-drive “C” using DriveImage XML 2.50. Not selecting “Raw mode” saved time and prevented wasted disk space on the backup-destination drive by otherwise copying and compressing unused sectors of my internal hard drive. Choosing “Fast” compression allowed me to copy and compress by a factor of 1.27 originally about 158 GB of internal-drive data onto my external hard drive in about 1.5 hours. And instead of overwriting the files Drive_C.dat and Drive_C.xml made from a previous hard-drive backup, deleting them might have ensured that I had sufficient disk space on my external hard drive to write the new hard-drive backup files of the same names onto that external hard drive.] So making that backup took a few hours of time to produce and write .xml and .dat files totaling about 126.1 GB in size onto my external HDD with my Dell computer having a 1.9-GigaHertz (GHz) central processing unit and 6 GB of Random Access Memory (RAM). That backup process initially appeared to be successful. However, later I found that external HDD could not be initialized in Windows 10’s Disk Management, accessible by right-”button”-clicking on the four-window-paned symbol on the left side of the Windows 10 taskbar and selecting “Disk Management,” due to a size problem associated with a GPT (Globally Unique Identifier [GUID] Partition Table) when trying to initialize that HDD. Based on what I have read on the Internet, it appears that someone thought that an external HDD which did not appear in a Windows file manager like File Explorer or perhaps Windows Explorer may have contained a corrupt partition table and/or operating system.
But gratefully it appears that Windows 10 might have eventually fixed my problem with the external HDD for me. That is while Windows 10 was running I plugged two Universal Serial Bus (USB) plugs from that external HDD into two of my 64-bit, Dell Inspiron-15, 3521 notebook computer’s USB ports. Then Windows 10’s computer program File Explorer showed that external HDD with a drive letter and its .xml and .dat files made by DriveImage XML 2.50 in the HDD backup; Windows 10’s Disk Management also showed that HDD as usable.
II. Suspicion of a Similar Disk- and/or Partition-Size Problem in a Restoration of Hard-Disk-Drive Data Using DriveImage XML 2.50
I haven’t tried going the other way in a restoration from the HDD backup on the relatively small, external HDD to my Dell computer’s larger, internal HDD drive using DriveImage XML 2.50. Has anyone had success with this sort of thing? I’m guessing that there might be a problem in doing this, as I discuss in the next paragraph.
III. Proposal for Restoring the Data Back Onto the Internal Hard-Disk Drive, Including How to “Burn” Images Onto Compact Discs in Windows 10 and How to Prepare “Bootable” Runtime “Live” and Repair-Windows-10 Compact Discs
I wondered if the problems in going between a large and small HDD using DriveImage XML 2.50 could be the partition table on one HDD having the size of the other HDD in it, something like what Adisak reported in this "thread" using Symantec Ghost 2003. For in the future possibly running DriveImage XML 2.50 for the purpose of restoring HDD data on an internal HDD from an external HDD, I produced a bootable, Recordable Compact Disc (CD-R) by first clicking on the hyperlink reading “Download the ISO image of the Runtime Live CD**” on on the Internet and later right-”button”-clicking on it in File Explorer in Windows 10 and selecting “Burn disc image” with a blank CD-R in my computer’s Digital Video Disc/Compact Disc- (DVD/CD-) writing drive (If you don’t see “Burn disc image” in this way, following much of method 1 on , make Windows Explorer the default program for opening a .iso [International Standards Organization] files by right-”button”-clicking on a .iso file, selecting “Open with…,” “Choose another app,” selecting “Windows Explorer,” clicking on the check box beside “Always use this app to open .iso files” to have a check mark placed in that check box, and then clicking on an “OK” button.). When a Windows-10-loaded computer is booted by a so-produced, “Live” CD-R, hopefully DriveImage XML 2.50 on it could be executed for the purpose of restoring HDD data from a relatively small, external HDD to a larger, internal HDD of a computer. But afterward I would expect the size in bytes on the internal HDD to incorrectly be that of the external HDD. Adisak suggested fixing that kind of problem, which he found in Symantec Ghost 2003, with a repair-Windows CD.
So in 64-bit Windows 10 Home Edition in probably September of the year 2016 I produced a repair-Windows CD by clicking on the symbol for four window panes on the left side of the Windows 10 taskbar, clicking on a “gear”-looking symbol, clicking on “Update and Security,” clicking on “Backup,” clicking on “Go to Backup and Restore (Windows 7);” and clicking on “Create a system repair disc” with a blank CD-R in my computer’s DVD/CD writer. Now, similar to what Adisak suggested in this thread, I return to the possible disk- and/or partition-size problem I hope could be solved by "booting" a computer using such a CD-R. In the next section of this posting I discuss this hypothetical situation in chronologically arranged stages.
IV. A Chronologically Arranged Outline of the Proposed Procedures From Backup to Restoration of the Hard-Disk-Drive Data
Stage 1, production of the backup of the data on the computer's internal HDD: Use DriveImage XML 2.50 to save or back up internal HDD data onto an external HDD. However, there may be a mistake on the size/sizes of the external HDD and/or the partition in which this backup is saved.
Stage 2 to fix the possible size problem or problems from "Stage 1:" Shut down Windows 10. Disconnect the external HDD from the computer. "Boot" the computer into Windows 10. Connect the external HDD to the computer. Hopefully Windows 10 itself will "detect" the external HDD, fix the size problem/problems on that external HDD, and show that external HDD with a logical drive letter in the Windows-10 computer program File Explorer. In my case this "stage-2" process only needed to be performed one time for one HDD backup using DriveImage XML 2.50.---That is in the future production of internal HDD data backups onto the external HDD using DriveImage XML 2.50 its .xml and .dat output files could be overwritten; and the sizes of the external HDD and the only partition I had on it were correct for that HDD; and the external HDD was shown with a logical drive letter in File Explorer.
Stage 3: The computer is booted using the Runtime "Live" CD I mentioned here.
Stage 4, restoring the data from the external HDD back to the internal HDD: While that "Live" CD is being run and after a storage medium has been set, the user executes DriveImage XML 2.50 on that "Live" CD to restore the data saved in stages 1 and 2 from the external HDD back to the internal HDD. However, afterward on the internal HDD in the partition table and perhaps elsewhere within Windows 10 the size of the partition and/or HDD might be incorrectly reported as the size of the partition and/or the size of the external HDD.
Stage 5 to fix the possible size problem/problems on the internal HDD from "stage 4:" By booting that Windows-10-loaded computer using the system-repair or repair-Windows-10 CD I have been discussing, I am in hopes that the possible incorrect disk size in GB in perhaps the partition table and maybe elsewhere within Windows 10 on the internal HDD could be corrected. But I admit that I haven’t tried this yet.
16